OxOffice Online technical manual
Provide instructions for installation, configuration, integration and deployment of OxOffice Online
- OxOffice Online main program installation instructions
- Installation guide for CentOS 7 (Community edition)
- Installation guide for Ubuntu 18.04 (Community edition)
- Installation guide for CentOS 7 in PVE LXC (Community edition)
- Installation guide for Ubuntu 18.04 in PVE LXC (Community edition)
- Installation guide for OxOffice Online v4 Community on CentOS 7
- Installation guide for OxOffice Online v4 Community on Rocky Linux 8
- Installation guide for OxOffice Online v4 Community on Ubuntu 20.04
- Installation guide for OxOffice Online v4 Community on CentOS 7 in PVE LXC
- Installation guide for OxOffice Online v4 Community on Rocky Linux 8 in PVE LXC
- Installation guide for OxOffice Online v4 Community on Ubuntu 20.04 in PVE LXC
- Installation guide for OxOffice Online v5 Community on Rocky Linux 8
- Installation guide for OxOffice Online v5 Community on Ubuntu 24.04
- OxOOL community edition compiling HOWTO
- OxOOL v4 community edition compiling on Ubuntu 20.04 HOWTO
- OxOOL v5 community edition compiling on Rocky Linux 8 HOWTO
- OxOOL v5 community edition compiling on Ubuntu 24.04 HOWTO
- OxOOL Module v4 Compiling HOWTO
- OxOOL Module Development HOWTO
OxOffice Online main program installation instructions
This document will explain how to install OxOOL (OxOffice Online) from scratch.
Installation guide for CentOS 7 (Community edition)
Please download and install the latest version of CentOS 7.
- Reboot and login as root. Then run the following commands to install needed programs and OxOOL Community edition
yum update -y
yum install vim net-tools unzip wget -y
cd /etc/yum.repos.d
wget http://www.oxoffice.com.tw/yum.repo/oxool-community.repo
yum update -y
yum groupinstall "OxOOL Community Group" -y- Turn off SELinux
vim /etc/selinux/config # You can choose any preferred text editor to edit this file
# Search "SELinux=enforcing" line, and change "enforcing" to "disabled" or "permissive" then save and quit- Configure firewalld and open the default 9980 port
firewall-cmd --zone=public --permanent --add-service=http
firewall-cmd --zone=public --permanent --add-port=9980/tcp- Start OxOOL Community edition service when booting
systemctl enable oxool
reboot- Reboot, login as root, and check if OxOOL Community edition starts normally
netstat -tlnpYou should get some results like this:
tcp      0    0    127.0.0.1:9981	  0.0.0.0:*	LISTEN   644/oxool
tcp6     0    0    :::9980		      :::*   	LISTEN   644/oxool
Congratulations and enjoy!
Installation guide for Ubuntu 18.04 (Community edition)
Please download and install the latest version of Ubuntu 18.04.
-
Reboot and login as a normal user. Then run the following commands to install needed programs and OxOOL Community edition
sudo apt update
sudo apt upgrade -y
sudo apt install vim openssh-server net-tools curl -y
# Chooese yes if you get any service restarting prompts

curl http://www.oxoffice.com.tw/apt/ubuntu/oxool-deb.key | sudo apt-key add
echo "deb [arch=amd64] http://www.oxoffice.com.tw/apt/ubuntu/ oxool-v3 main" > ~/oxool.list
sudo mv ~/oxool.list /etc/apt/sources.list.d/
sudo apt update
sudo apt install oxool oxoffice* -y- Start OxOOL Community edition service when booting
sudo systemctl enable oxool
sudo reboot- Reboot, login as a normal user, and check if OxOOL Community edition starts normally
sudo netstat -tlnpYou should get some results like this:
Active Internet connections (only servers)
Proto Recv-Q Send-Q Local Address           Foreign Address         State       PID/Program name
tcp        0      0 127.0.0.1:9981          0.0.0.0:*               LISTEN      22383/oxool
tcp6       0      0 :::9980                 :::*                    LISTEN      22383/oxool
Congratulations and enjoy!
Thanks to Franklin (from ezgo team) to provide installation guide for Ubuntu!
Installation guide for CentOS 7 in PVE LXC (Community edition)
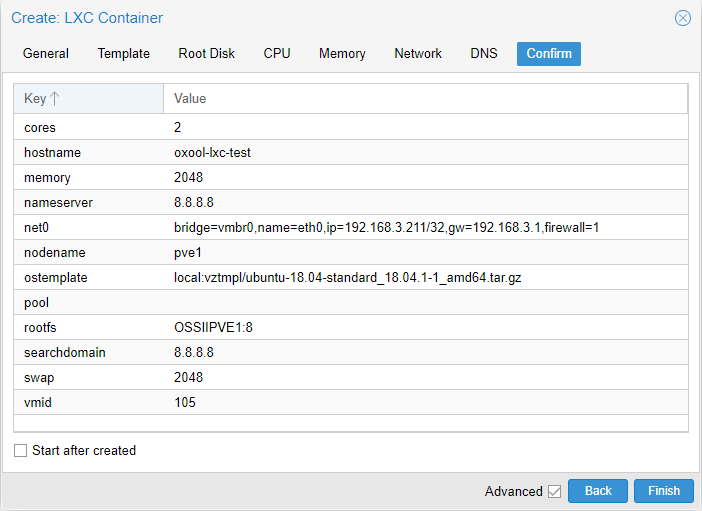
- Please download "centos-7-default_20190926_amd64.tar.xz" LXC template in PVE

- Create a new CT using "Create CT" button (please uncheck "Unprivileged container" for now, or you may encounter some weird issues)


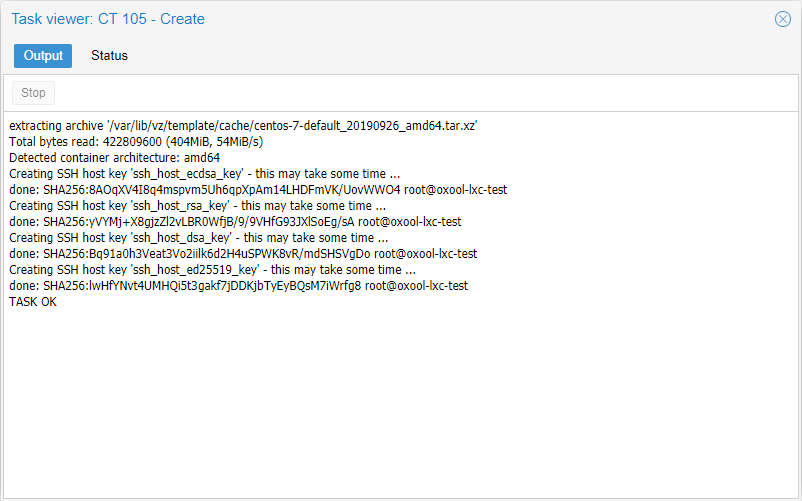
- Reboot and login as root. Then run the following commands to install needed programs and OxOOL Community edition
yum install vim openssh* net-tools unzip wget -y
cd /etc/yum.repos.d
wget --no-check-certificate http://www.oxoffice.com.tw/yum.repo/oxool-community.repo
yum update -y
yum groupinstall "OxOOL Community Group" -y- Start OxOOL Community edition service when booting
systemctl enable oxool
reboot- Reboot, login as root, and check if OxOOL Community edition starts normally
netstat -tlnpYou should get some results like this:
Active Internet connections (only servers)
Proto Recv-Q Send-Q Local Address           Foreign Address         State       PID/Program name
tcp        0      0 127.0.0.1:9981          0.0.0.0:*               LISTEN      1049/oxool
tcp6       0      0 :::9980                 :::*                    LISTEN      1049/oxool
Congratulations and enjoy!
P. S. When steps above are finished, you can use "More"→"Convert to template" to generate new LXC template that contains OxOOL Community edition.
Installation guide for Ubuntu 18.04 in PVE LXC (Community edition)
- Please download "ubuntu-18.04-standard_18.04.1-1_amd64.tar.gz" LXC template in PVE

- Create a new CT using "Create CT" button (please uncheck "Unprivileged container" for now, or you may encounter some weird issues)
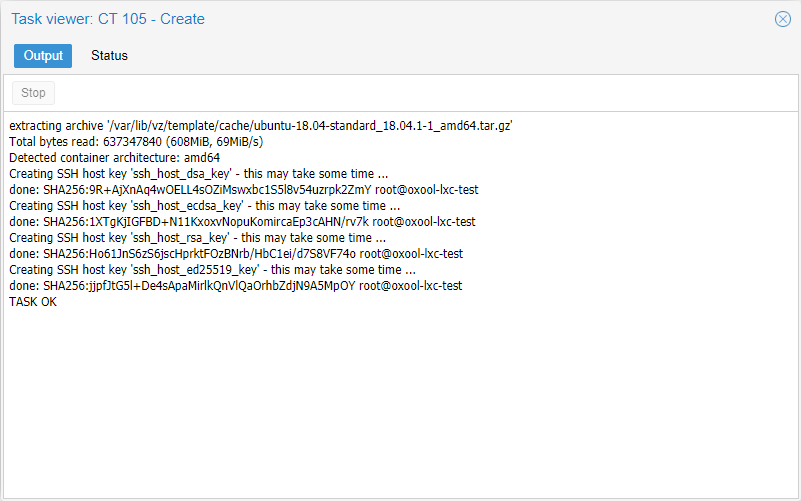
- Reboot and run the following commands to install needed programs and OxOOL Community edition
apt update
apt upgrade -y
apt install vim openssh-server net-tools curl gnupg2 -y
# Chooese yes if you get any service restarting prompts

curl http://www.oxoffice.com.tw/apt/ubuntu/oxool-deb.key | apt-key add
echo "deb [arch=amd64] http://www.oxoffice.com.tw/apt/ubuntu/ oxool-v3 main" > ~/oxool.list
mv ~/oxool.list /etc/apt/sources.list.d/
apt update
apt install oxool oxoffice* -y- Start OxOOL Community edition service when booting
systemctl enable oxool
reboot- Reboot and check if OxOOL Community edition starts normally
netstat -tlnpYou should get some results like this:
Active Internet connections (only servers)
Proto Recv-Q Send-Q Local Address           Foreign Address         State       PID/Program name
tcp        0      0 127.0.0.1:9981          0.0.0.0:*               LISTEN      22383/oxool
tcp6       0      0 :::9980                 :::*                    LISTEN      22383/oxool
Congratulations and enjoy!
P. S. When steps above are finished, you can use "More"→"Convert to template" to generate new LXC template that contains OxOOL Community edition.
Installation guide for OxOffice Online v4 Community on CentOS 7
Please download and install the latest version of CentOS 7 (we recommend using Minimal edition), when operating system installation is done, please follow steps to upgrade your system, install required packages and OxOffice Online v4 Community (we recommend executing these commands as normal user, remove sudo prefix if you are excuting them as root user).
sudo yum upgrade -y
sudo yum install vim net-tools unzip wget -y
cd /etc/yum.repos.d
sudo wget http://www.oxoffice.com.tw/rpm/el/oxool-community-v4-centos7.repo
sudo yum upgrade -y
sudo yum groupinstall "OxOOL Community Group" -y
Disable SELinux
sudo vim /etc/selinux/config # You can choose any preferred text editor to edit this file
# Search "SELinux=enforcing" line, and change "enforcing" to "disabled" or "permissive" then save and quit
Configure firewalld and open the default 9980 port
sudo firewall-cmd --zone=public --permanent --add-service=http
sudo firewall-cmd --zone=public --permanent --add-port=9980/tcp
sudo firewall-cmd --reload
Check if OxOOL Community edition starts normally
sudo netstat -tlnp
You should get some results like this:
tcp6 0 0 :::9980 :::* LISTEN 644/oxool
Installation guide for OxOffice Online v4 Community on Rocky Linux 8
Please download and install the latest version of Rocky Linux 8, when operating system installation is done, please follow steps to upgrade your system, install required packages and OxOffice Online v4 Community (we recommend executing these commands as normal user, remove sudo prefix if you are excuting them as root user).
sudo dnf config-manager --set-enabled powertools
sudo dnf upgrade -y
sudo dnf install epel-release -y
sudo dnf install vim net-tools unzip wget -y
cd /etc/yum.repos.d
sudo wget http://www.oxoffice.com.tw/rpm/el/oxool-community-v4-el8.repo
sudo dnf upgrade -y
sudo dnf groupinstall "OxOOL Community Group" -y
Disable SELinux
sudo vim /etc/selinux/config # You can choose any preferred text editor to edit this file
# Search "SELinux=enforcing" line, and change "enforcing" to "disabled" or "permissive" then save and quit
Configure firewalld and open the default 9980 port
sudo firewall-cmd --zone=public --permanent --add-service=http
sudo firewall-cmd --zone=public --permanent --add-port=9980/tcp
sudo firewall-cmd --reload
Check if OxOOL Community edition starts normally
sudo netstat -tlnp
You should get some results like this:
tcp6 0 0 :::9980 :::* LISTEN 644/oxool
Installation guide for OxOffice Online v4 Community on Ubuntu 20.04
Please download and install the latest version of Ubuntu 20.04, when operating system installation is done, please follow steps to upgrade your system, install required packages and OxOffice Online v4 Community.
sudo apt update
sudo apt upgrade -y
sudo apt install vim openssh-server net-tools curl -y
# Chooese yes if you get any service restarting prompts
curl http://www.oxoffice.com.tw/deb/OSSII.key | sudo apt-key add
cd /etc/apt/sources.list.d/
sudo wget http://www.oxoffice.com.tw/deb/oxool-community-v4-focal.list
sudo apt update
sudo apt install oxool -y
Start OxOOL Community edition service when booting
sudo systemctl enable oxool
sudo reboot
Check if OxOOL Community edition starts normally
sudo netstat -tlnp
You should get some results like this:
tcp6 0 0 :::9980 :::* LISTEN 644/oxool
Installation guide for OxOffice Online v4 Community on CentOS 7 in PVE LXC
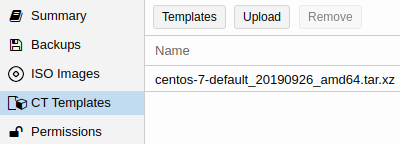
Please download "centos-7-default" LXC template on your PVE first
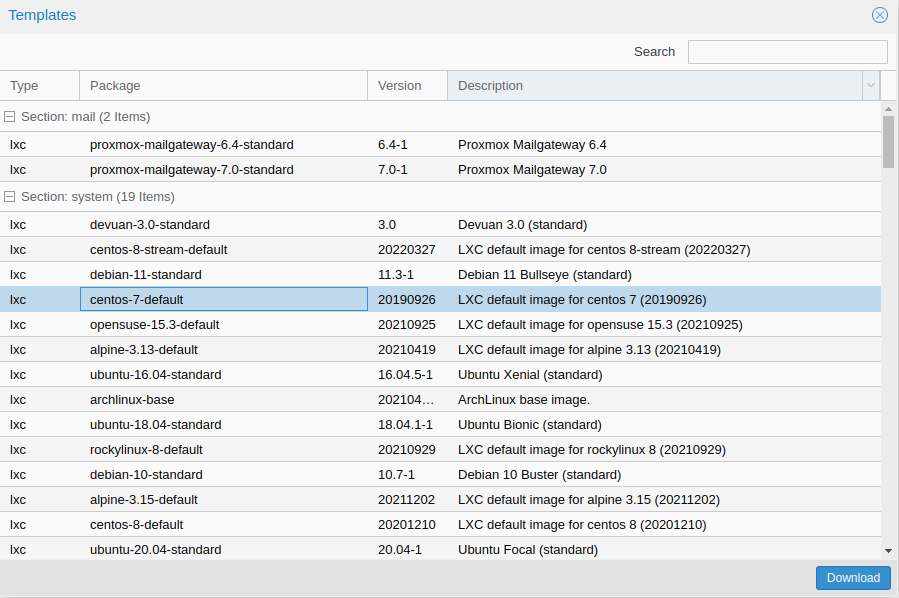
You can see CentOS 7 LXC template in "CT templates" section
Create a new CT using "Create CT" button
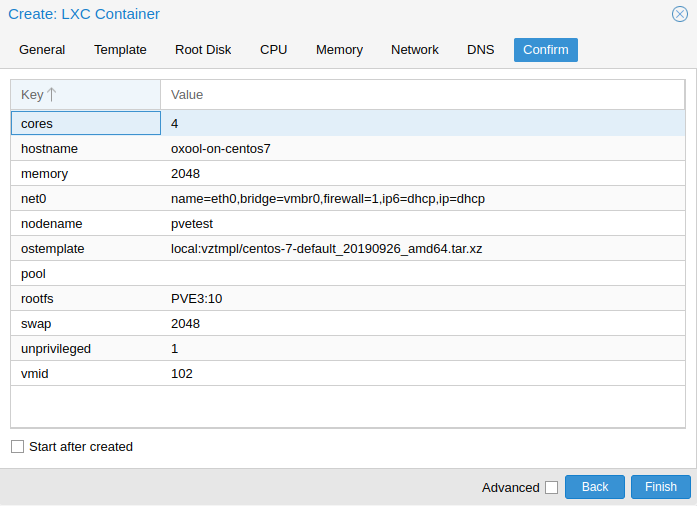
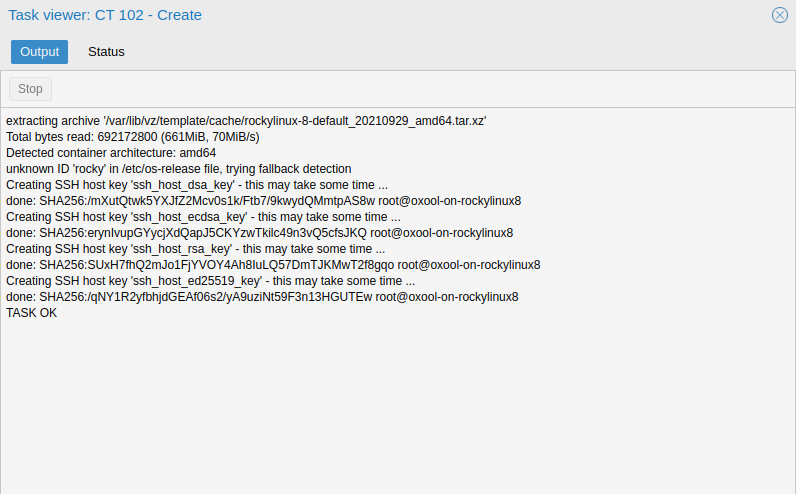
Start created CT, login as root and excute following commands to install needed programs and OxOOL Community edition:
yum install vim openssh* net-tools unzip wget -y
cd /etc/yum.repos.d
wget http://www.oxoffice.com.tw/rpm/el/oxool-community-v4-centos7.repo
yum upgrade -y
yum groupinstall "OxOOL Community Group" -y
Start OxOOL Community edition service when booting and reboot
systemctl enable oxoolwsd
reboot
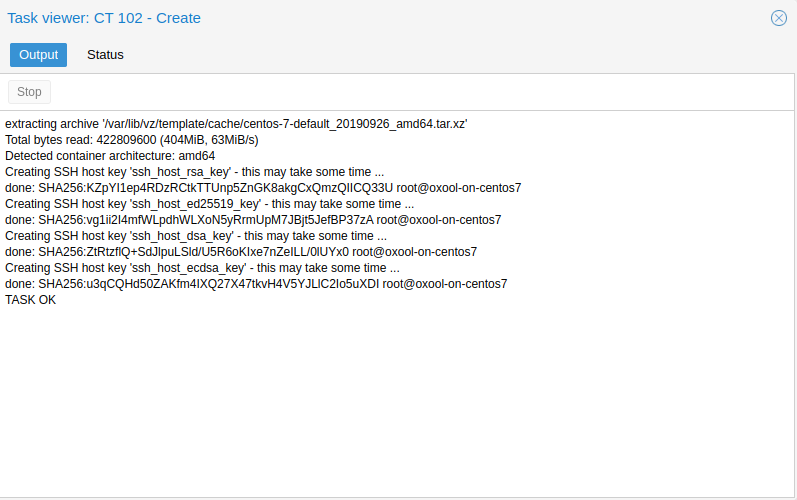
Check if OxOOL Community edition starts normally
netstat -tlnp
You should get some results like this:
tcp6 0 0 :::9980 :::* LISTEN 644/oxool
P. S. When steps above are finished, you can use "More"→"Convert to template" to generate new LXC template that contains OxOOL Community edition.
Installation guide for OxOffice Online v4 Community on Rocky Linux 8 in PVE LXC
Please download "rocktlinux-8-default" LXC template on your PVE first
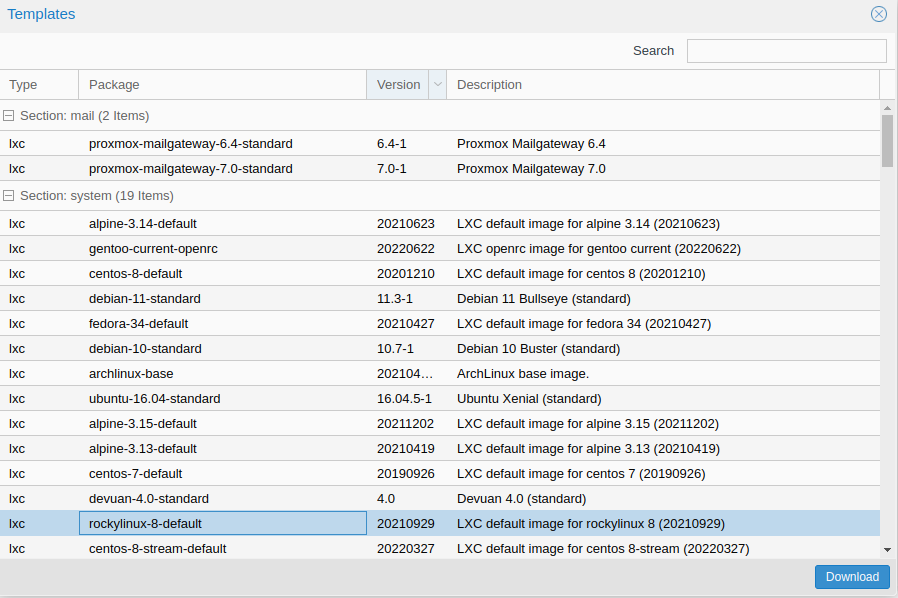
You can see Rocky Linux 8 LXC template in "CT templates" section

Create a new CT using "Create CT" button
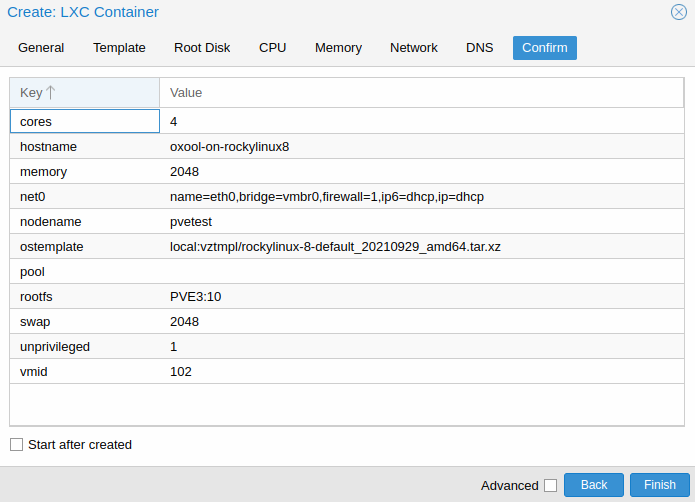
Start created CT, login as root and excute following commands to install needed programs and OxOOL Community edition:
dnf config-manager --set-enabled powertools
dnf install vim openssh* net-tools unzip wget -y
cd /etc/yum.repos.d
wget http://www.oxoffice.com.tw/rpm/el/oxool-community-v4-el8.repo
dnf upgrade -y
dnf groupinstall "OxOOL Community Group" -y
Start OxOOL Community edition service when booting and reboot
systemctl enable oxoolwsd
reboot
Check if OxOOL Community edition starts normally
netstat -tlnp
You should get some results like this:
tcp6 0 0 :::9980 :::* LISTEN 644/oxool
P. S. When steps above are finished, you can use "More"→"Convert to template" to generate new LXC template that contains OxOOL Community edition.
Installation guide for OxOffice Online v4 Community on Ubuntu 20.04 in PVE LXC
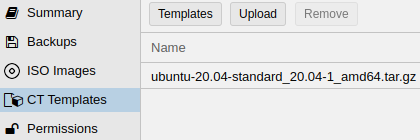
Please download "ubuntu-20.04-standard" LXC template on your PVE first
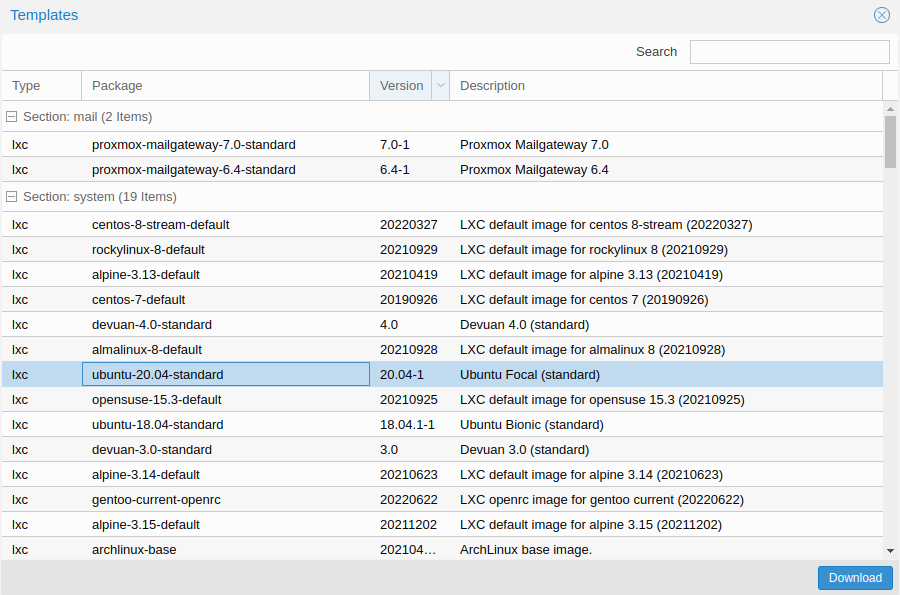
You can see Ubuntu 20.04 LXC template in "CT templates" section
Create a new CT using "Create CT" button
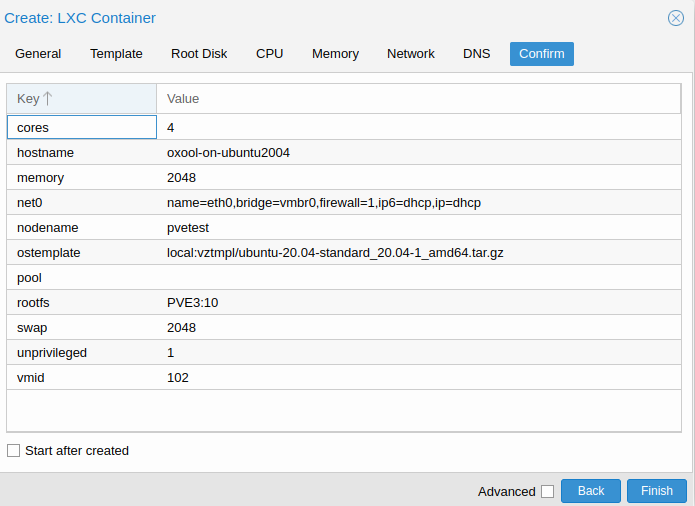
Start created CT, login as root and excute following commands to install needed programs and OxOOL Community edition:
apt update
apt upgrade -y
apt install vim openssh-server net-tools curl gnupg2 wget -y
# Chooese yes if you get any service restarting prompts
curl http://www.oxoffice.com.tw/deb/OSSII.key | sudo apt-key add
cd /etc/apt/sources.list.d/
wget http://www.oxoffice.com.tw/deb/oxool-community-v4-focal.list
apt update
apt install oxool -y
Start OxOOL Community edition service when booting and reboot
systemctl enable oxool
reboot
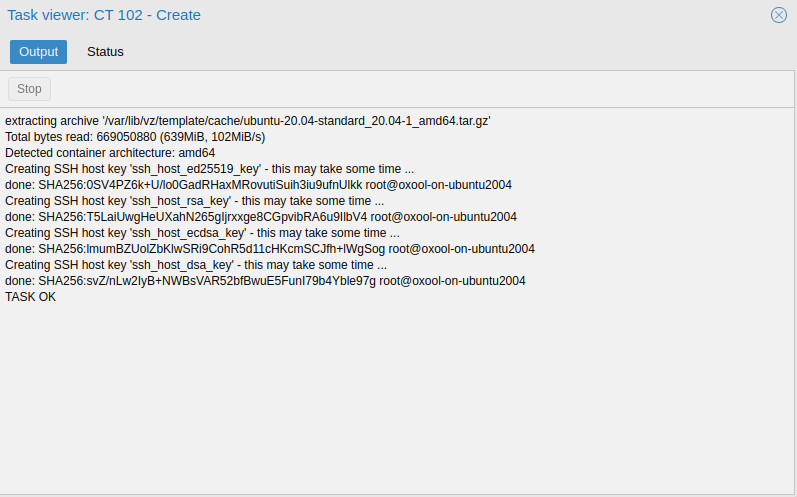
Check if OxOOL Community edition starts normally
netstat -tlnp
You should get some results like this:
tcp6 0 0 :::9980 :::* LISTEN 644/oxool
P. S. When steps above are finished, you can use "More"→"Convert to template" to generate new LXC template that contains OxOOL Community edition.
Installation guide for OxOffice Online v5 Community on Rocky Linux 8
Please download and install the latest version of Rocky Linux 8, when operating system installation is done, please follow steps to upgrade your system, install required packages and OxOffice Online v5 Community (we recommend executing these commands as normal user, remove sudo prefix if you are excuting them as root user).
sudo dnf config-manager --set-enabled powertools
sudo dnf upgrade -y
sudo dnf install epel-release -y
sudo dnf install vim net-tools unzip wget -y
sudo wget -P /etc/yum.repos.d http://www.oxoffice.com.tw/rpm/el/oxool-community-v5-el8.repo
sudo dnf upgrade -y
sudo dnf groupinstall "OxOOL Community Group" -y
Disable SELinux
sudo vim /etc/selinux/config # You can choose any preferred text editor to edit this file
# Search "SELinux=enforcing" line, and change "enforcing" to "disabled" or "permissive" then save and quit
Configure firewalld and open the default 9980 port
sudo firewall-cmd --zone=public --permanent --add-service=http
sudo firewall-cmd --zone=public --permanent --add-port=9980/tcp
sudo firewall-cmd --reload
Check if OxOOL Community edition starts normally
sudo netstat -tlnp
You should get some results like this:
tcp6 0 0 :::9980 :::* LISTEN 644/oxool
Installation guide for OxOffice Online v5 Community on Ubuntu 24.04
Please download and install the latest version of Ubuntu 24.04, when operating system installation is done, please follow steps to upgrade your system, install required packages and OxOffice Online v5 Community.
sudo apt update
sudo apt upgrade -y
sudo apt install vim openssh-server net-tools curl -y
# Chooese yes if you get any service restarting prompts
sudo curl -o /etc/apt/keyrings/OSSII.asc http://www.oxoffice.com.tw/deb/OSSII.key
sudo curl -o /etc/apt/sources.list.d/oxool-community-v5-noble.list http://www.oxoffice.com.tw/deb/oxool-community-v5-noble.list
sudo apt update
sudo apt install oxool -y
Start OxOOL Community edition service when booting
sudo systemctl enable oxool
sudo reboot
Check if OxOOL Community edition starts normally
sudo netstat -tlnp
You should get some results like this:
tcp6 0 0 :::9980 :::* LISTEN 644/oxool
OxOOL community edition compiling HOWTO
If you want to compile the latest version of the OxOffice Online community edition on GitHub, please refer to this document for instructions on how to set up the compilation environment and the compilation process for the OxOffice Online community edition.
OxOOL v4 community edition compiling on Ubuntu 20.04 HOWTO
-
First thing first, install a Ubuntu 20.04 server! Can it be run on Ubuntu 20.04 desktop? Yes, but why bother? :-)
-
Upgrade the system:
sudo apt update
sudo apt upgrade -y
- Make sure you install OpenSSH and Vim (I'm a Vim guy! All right, but remember to install your favorite editor, okay?) and a couple of tools:
sudo apt install vim openssh-server net-tools curl git -y
- Import OSSII public key
curl http://www.oxoffice.com.tw/deb/OSSII.key | sudo apt-key add
- Set up OxOOL repository
cd /etc/apt/sources.list.d/
sudo wget http://www.oxoffice.com.tw/deb/oxool-community-v4-focal.list
- Install software packages necessary for compiling OxOOL (use option apt install -y if you don't like to be asked everytime)
sudo apt update
sudo apt install oxoffice* libpoco-dev libgumbo-dev
sudo apt install build-essential libsqlite3-dev libcurl4-openssl-dev libcppunit-dev libcap-dev libcap2-bin libgit2-dev libtool libpng-dev automake m4 wget curl autoconf pkg-config openssl libgumbo-dev ccache fontconfig libfontconfig1-dev libpam-dev
sudo apt install devscripts debhelper dh-systemd dh-exec
sudo apt install libodbc1 libpcre16-3 libpcre3-dev libpcre32-3 libpcrecpp0v5
sudo apt install hunspell
sudo apt install python3-polib python3-lxml
- Install and setup Node.js
cd ~
curl -fsSL https://deb.nodesource.com/setup_lts.x | sudo -E bash -
sudo apt install -y nodejs
- Clone OxOOL-community code from GitHub and switch to branch
v4
cd ~
git clone https://github.com/OSSII/oxool-community.git
cd oxool-community
git switch v4
- For debug and developing, run autogen.sh directly WITHOUT running configure
cd oxool-community
./autogen.sh
It will enable debug options so that you can test and debug by running make run.
- For installing, you can build deb packages directly:
debuild -b -uc -usThe built deb packages will be one level up the compiling directory:
cd ..
ls oxool_4.x.x-1.community_amd64.deb
The generated deb files can be then installed in the system.
OxOOL v5 community edition compiling on Rocky Linux 8 HOWTO
Please install Rocky Linux 8 first, and then execute the following commands to update the system and install the necessary software packages (note that this is based on logging in as a regular user, and it is not recommended to use the root account during compilation).
sudo dnf config-manager --set-enabled powertools
sudo dnf upgrade -y
sudo dnf install vim net-tools unzip wget -y
sudo wget -P /etc/yum.repos.d http://www.oxoffice.com.tw/rpm/el/oxool-community-v5-el8.repo
sudo dnf install epel-release -y
sudo dnf upgrade -y
sudo dnf install make git yum-utils libpcap libcap-devel libgit2-devel libzstd-devel poco-devel ccache python3-devel python3-polib python3-lxml -y
sudo dnf install libtool gcc-c++ fontconfig-devel cppunit-devel pam-devel rpm-build -y
sudo dnf install oxoffice* poco* gumbo* -y
Disable SELinux
vim /etc/selinux/config # vim 可代換成任何您慣用的文字編輯器
# 尋找 SELinux=enforcing 此行並將 enforcing 改為 disabled 或 permissive 並存檔離開
Install node.js
sudo dnf module enable nodejs:18 -y
sudo dnf install nodejs -y
Clone source code of OxOffice Online v5 Community
git clone https://github.com/OSSII/oxool-community.git
cd oxool-community
git switch v5
Compile and package OxOffice Online v5 Community Edition
./autogen.sh
make dist
rpmbuild -tb oxool-x.x.x.tar.gz
The compiled RPM software package will be placed in the following path
~/rpmbuild/RPMS/x86_64
The RPM software package here can be used for installation.
OxOOL v5 community edition compiling on Ubuntu 24.04 HOWTO
-
First thing first, install a Ubuntu 24.04 server! Can it be run on Ubuntu 24.04 desktop? Yes, but why bother? :-)
-
Upgrade the system:
sudo apt update
sudo apt upgrade -y
- Make sure you install OpenSSH and Vim (I'm a Vim guy! All right, but remember to install your favorite editor, okay?) and a couple of tools:
sudo apt install vim openssh-server net-tools curl git -y
- Import OSSII public key
sudo curl -o /etc/apt/keyrings/OSSII.asc http://www.oxoffice.com.tw/deb/OSSII.key
- Set up OxOOL repository
sudo curl -o /etc/apt/sources.list.d/oxool-community-v5-noble.list http://www.oxoffice.com.tw/deb/oxool-community-v5-noble.list
- Install software packages necessary for compiling OxOOL (use option apt install -y if you don't like to be asked everytime)
sudo apt update
sudo apt install oxoffice* libpoco-dev libgumbo-dev
sudo apt install -y build-essential libsqlite3-dev libcurl4-openssl-dev libcppunit-dev libcap-dev libcap2-bin libgit2-dev libtool libpng-dev automake m4 wget autoconf pkg-config openssl libgumbo-dev ccache fontconfig libfontconfig1-dev libpam-dev
sudo apt install -y devscripts debhelper dh-exec
sudo apt install -y libpcre16-3 libpcre3-dev libpcre32-3 libpcrecpp0v5
sudo apt install -y hunspell
sudo apt install -y python3-polib python3-lxml
- Install and setup Node.js
cd ~
curl -fsSL https://deb.nodesource.com/setup_20.x -o nodesource_setup.sh
sudo -E bash nodesource_setup.sh
sudo apt install -y nodejs
- Clone OxOOL-community code from GitHub and switch to branch
v5
cd ~
git clone https://github.com/OSSII/oxool-community.git
cd oxool-community
git switch v5
- For debug and developing, run autogen.sh directly WITHOUT running configure
cd oxool-community
./autogen.sh
It will enable debug options so that you can test and debug by running make run.
- For installing, you can build deb packages with following command. The built deb packages will be one level up the compiling directory:
./autogen.sh
debuild -b -uc -us
cd ..
ls oxool*.deb
The generated deb files can be then installed in the system.
OxOOL Module v4 Compiling HOWTO
1. Preparing The Environment
-
Follow the instructions of OxOOL Community Compiling HOWTO to compile oxool-community -- English version coming soon
-
Be noticed that you should use
autogen.shand don't directly run configure here.autogen.shby default would add--enable-debugand load ModuleTesting module for developing and test modules. -
Generate
oxoolandoxool-devrpm/deb packages byrpmbuildordebuild.
-
-
Install
oxoolandoxool-devyou just generated into your development environment. oxool-dev contains the headers necessary for building modules, module templates andoxool-module-makerwhich will make it a lot easier to start a new module.- Notice that you also need to install
oxoffice*packages before installingoxool. This is described in the documents of OxOOL Community Compiling HOWTO
- Notice that you also need to install
2. Create an basic module repository by oxool-module-maker
-
Run
oxool-module-makerto create a module git repository from a module template. The parameters are:-
--module-name=name: Module name, used for the git repository name. It must match the regular expression:^[\w\@#]+$which means all the upper and lower case letters, number 0-9, underline _ and # @ symbols. Notice that dash '-' is not allowed due to C++ class naming issue, and underline '_' is better not used. -
--serviceURI=serviceURI: URI used by this module. If it ends with a slash '/' it means this module can handle a series of related commands. For example, "/oxool/user/" means this module is used to handle requests such as /oxool/user/add, /oxool/user/del, /oxool/user/update, and so on. Without the ending slash means it is a fixed URI. -
--version=version: Version number. Default "0.0.1"。 -
--summary=summary: Specify Summary field, used in Summary fields in generated rpm file. -
--description=Description: Specify Description field, used in Description fields in generated deb file. -
--author=author: Module author. By default it will use the user.name and user.email in global git settings. -
--license=license: Module license. Default "MPLv2.0". -
--adminPrivilege=true/false: Does this module URI needs admin privileges? Default "false". -
--adminIcon=icon: The icon used in backend administration page (See getbootstrap.com for references.) Default "bug-fill". -
--adminItem=text: The text/title used in backend administration page. -
--template-path=path: Assign the module template path. The new created module will be generated by copying files from this path. By default the module template is in/usr/share/oxool-devel/module-template. -
--output-path=path: The path of generated module. By default it will be in user home directory. Notice that it may cause problems if you use symbols like ~ so better use a full path name. -
Example:
-
oxool-module-maker --module-name="samplemod" --serviceURI="/oxool/samplemod/" --summary="A sample moudle service on OxOOL" --description="A sample module service on OxOOL" --output-path="/home/oxool/git"
- A new git repository will be generated in the specified output-path. Inside the folder are all the files from the specified template-path folder.
3. Compile and Test Modules
-
Use
autogen.shto generateconfigure, then runconfigureto check the environment and generate Makefile. -
Compile with
make. -
Before testing the module, go to oxool-community folder and run
make runto activate a testing oxool environment. Notice that when you installoxoolpackages in your environment, it will activate a systemd serviceoxool.serviceand occupy the default port like 9980. So you may need to deactivate this systemd service bysudo systemctl stop oxoolbefore running the testing oxool environment. -
After starting the testing environment, go back to the module folder and run
./test.sh <XML file for this module>.test.shwill call ModuleTesting module in oxool and sent the XML path to it. ModuleTesting will then notify oxool to load the .so file of this module (under .libs/ of the module folder). Now you can call and run the module by calling the URI specified inserviceURI. For example, open your browser withhttp://127.0.0.1:9980/oxool/samplemod/. -
If you change something in the module, you need to re-compile the module and re-run
test.shto load the new .so into oxool to make it effect.
OxOOL Module Development HOWTO
This manual will simply explain the file structures in a standard OxOOL module repository and how to develop an OxOOL module.
Default OxOOL Module File Structure
When you use oxool-module-maker to generate a template module repository, by default it will use the module template defined in the package oxool-dev. The important file and folder description in the template is described below:
-
ModuleConfiguration.md: Description of module configuration. -
module.xml.in: Module XML file template, it will be used to generate module XML file when executingconfigure. If you need to change some configurations after generating a module, you should follow the instructions inModuleConfiguration.mdto edit this file and re-runautogen.shandconfigure. -
module.spec.in: It is used to generate RPM spec file. -
debian/*: It is used to generate DEB file. -
admin/*: If this module has a backend administration page you should put it in this folder. The name shown in the admin page is defined in the<adminItem>tag inmodule.xml.in, or assign--adminItemwhen runningoxool-module-maker. See README.md in the generated git repository for reference. -
src/*: Module C++ source files. It will be compiled generated .so file for OxOOL to load. -
html/*: Module HTML frontend files. The default page isindex.html. -
test.sh: When developing and testing a module, this file is used to pass the module XML file to OxOOL to load. See "OxOOL Module Compiling Manual" for detail.
C++ Class Methods in an OxOOL module
In the module repo generated by oxool-module-maker, by default there is a Module.cpp under src/ folder. In this Module.cpp there is the base class of this module, named by the module name. Besides constructors and destructors, there are some methods as well:
-
getVersion(): Get version number. -
initialize(): Initialize. -
handleRequest(): Handle requests from client (frontend). You should implement here to handle the requests from the frontend web client. -
handleAdminRequest(): Handle requests from admin pages. You should implement here to handle the requests from admin pages. -
handleAdminMessage(): Handle websocket messages from backend admin pages.