MariaDB 10.3 系列
[](https://docs.ossii.com.tw/uploads/images/gallery/2022-07/image-1658885450326.png) 和 RedHat / Centos 系列的平台不同,Ubuntu Server 在軟體套件比較會跟上新的版本趨勢,支援多項新的功能特色,但話雖如此,舊版本仍是保有比較穩定且較少新的 bug 的優點,就看每種系統考慮的因素那種較重要,都可以自由選用,而 MariaDB 10 系列版本則是效能改善明顯,並且支援 Galera Cluster 的叢集架構,非常高效,所以目前很多系統早就升級成為 10.x 的版本了。Apache 2.4 系列
[](https://docs.ossii.com.tw/uploads/images/gallery/2022-07/image-1658885761408.png) Ubuntu Server 20.04 的 Apache Server 版本,預設一樣採用 2.4,而在次要版本號的部份和另一套 Rocky Linux 8 系統一樣都支援到 35 以後的版本,支援較多新的功能。PHP 8.x 系列
[](https://docs.ossii.com.tw/uploads/images/gallery/2022-07/image-1658886001989.png) 目前各大系統主要都是使用 PHP 7.4 的版本,不過在此我們會以 PHP 8 來進行佈署示範,以 [PHP 官方](https://www.php.net/supported-versions.php)提供的資訊來說,7.2 版本已經在 2021 年 1 月停止維護,7.4 版本即將在 2022 年 11 月停止維謢護,故目前建議可以考慮評估 8.0 或是之後的 8.1 版本。phpMyAdmin 4.9.5 系列
[](https://docs.ossii.com.tw/uploads/images/gallery/2022-07/image-1658886039325.png) 對於系統管理老手來說其實不大需要 phpMyAdmin 這套 Web UI 的資料庫管理工具,畢竟盡量能用指令管理,就不需多安裝一套工具,不過在此還是介紹一下安裝及設定方式,而且在 Ubuntu Server 上也有對應的 apt Server 了,更新上相對會容易的多,在初始化安裝上也設定了許多限制,在不開放給外部使用的情形下,使用一些工具來輔助管理也是不錯的選擇。 # 安裝 Apache 伺服器 ##### **1 安裝相關套件** 安裝指令如下所示: ```shell $ sudo apt -y install apache2 apache2-utils [sudo] password for ossii: ``` 接下來會出現一大堆訊息,包含安裝及啟用各式預設的模組功能,如下所示: > Reading package lists... Done > Building dependency tree > Reading state information... Done > The following package was automatically installed and is no longer required: > libfwupdplugin1 > Use 'sudo apt autoremove' to remove it. > **The following additional packages will be installed:** > **apache2-bin apache2-data libapr1 libaprutil1 libaprutil1-dbd-sqlite3 libaprutil1-ldap libjansson4 liblua5.2-0 ssl-cert** > **Suggested packages:** > **apache2-doc apache2-suexec-pristine | apache2-suexec-custom www-browser openssl-blacklist** > **The following NEW packages will be installed:** > **apache2 apache2-bin apache2-data apache2-utils libapr1 libaprutil1 libaprutil1-dbd-sqlite3 libaprutil1-ldap libjansson4 liblua5.2-0 ssl-cert** > 0 upgraded, 11 newly installed, 0 to remove and 0 not upgraded. > Need to get 1,867 kB of archives. > After this operation, 8,095 kB of additional disk space will be used. > Get:1 http://tw.archive.ubuntu.com/ubuntu focal/main amd64 libapr1 amd64 1.6.5-1ubuntu1 \[91.4 kB\] > Get:2 http://tw.archive.ubuntu.com/ubuntu focal/main amd64 libaprutil1 amd64 1.6.1-4ubuntu2 \[84.7 kB\] > Get:3 http://tw.archive.ubuntu.com/ubuntu focal/main amd64 libaprutil1-dbd-sqlite3 amd64 1.6.1-4ubuntu2 \[10.5 kB\] > Get:4 http://tw.archive.ubuntu.com/ubuntu focal/main amd64 libaprutil1-ldap amd64 1.6.1-4ubuntu2 \[8,736 B\] > Get:5 http://tw.archive.ubuntu.com/ubuntu focal/main amd64 libjansson4 amd64 2.12-1build1 \[28.9 kB\] > Get:6 http://tw.archive.ubuntu.com/ubuntu focal/main amd64 liblua5.2-0 amd64 5.2.4-1.1build3 \[106 kB\] > Get:7 http://tw.archive.ubuntu.com/ubuntu focal-updates/main amd64 apache2-bin amd64 2.4.41-4ubuntu3.12 \[1,181 kB\] > Get:8 http://tw.archive.ubuntu.com/ubuntu focal-updates/main amd64 apache2-data all 2.4.41-4ubuntu3.12 \[159 kB\] > Get:9 http://tw.archive.ubuntu.com/ubuntu focal-updates/main amd64 apache2-utils amd64 2.4.41-4ubuntu3.12 \[84.5 kB\] > Get:10 http://tw.archive.ubuntu.com/ubuntu focal-updates/main amd64 apache2 amd64 2.4.41-4ubuntu3.12 \[95.6 kB\] > Get:11 http://tw.archive.ubuntu.com/ubuntu focal/main amd64 ssl-cert all 1.0.39 \[17.0 kB\] > Fetched 1,867 kB in 0s (9,618 kB/s) > Preconfiguring packages ... > Selecting previously unselected package libapr1:amd64. > (Reading database ... 74596 files and directories currently installed.) > Preparing to unpack .../00-libapr1\_1.6.5-1ubuntu1\_amd64.deb ... > Unpacking libapr1:amd64 (1.6.5-1ubuntu1) ... > Selecting previously unselected package libaprutil1:amd64. > Preparing to unpack .../01-libaprutil1\_1.6.1-4ubuntu2\_amd64.deb ... > Unpacking libaprutil1:amd64 (1.6.1-4ubuntu2) ... > Selecting previously unselected package libaprutil1-dbd-sqlite3:amd64. > Preparing to unpack .../02-libaprutil1-dbd-sqlite3\_1.6.1-4ubuntu2\_amd64.deb ... > Unpacking libaprutil1-dbd-sqlite3:amd64 (1.6.1-4ubuntu2) ... > Selecting previously unselected package libaprutil1-ldap:amd64. > Preparing to unpack .../03-libaprutil1-ldap\_1.6.1-4ubuntu2\_amd64.deb ... > Unpacking libaprutil1-ldap:amd64 (1.6.1-4ubuntu2) ... > Selecting previously unselected package libjansson4:amd64. > Preparing to unpack .../04-libjansson4\_2.12-1build1\_amd64.deb ... > Unpacking libjansson4:amd64 (2.12-1build1) ... > Selecting previously unselected package liblua5.2-0:amd64. > Preparing to unpack .../05-liblua5.2-0\_5.2.4-1.1build3\_amd64.deb ... > Unpacking liblua5.2-0:amd64 (5.2.4-1.1build3) ... > Selecting previously unselected package apache2-bin. > Preparing to unpack .../06-apache2-bin\_2.4.41-4ubuntu3.12\_amd64.deb ... > Unpacking apache2-bin (2.4.41-4ubuntu3.12) ... > Selecting previously unselected package apache2-data. > Preparing to unpack .../07-apache2-data\_2.4.41-4ubuntu3.12\_all.deb ... > Unpacking apache2-data (2.4.41-4ubuntu3.12) ... > Selecting previously unselected package apache2-utils. > Preparing to unpack .../08-apache2-utils\_2.4.41-4ubuntu3.12\_amd64.deb ... > Unpacking apache2-utils (2.4.41-4ubuntu3.12) ... > Selecting previously unselected package apache2. > Preparing to unpack .../09-apache2\_2.4.41-4ubuntu3.12\_amd64.deb ... > Unpacking apache2 (2.4.41-4ubuntu3.12) ... > Selecting previously unselected package ssl-cert. > Preparing to unpack .../10-ssl-cert\_1.0.39\_all.deb ... > Unpacking ssl-cert (1.0.39) ... > Setting up libapr1:amd64 (1.6.5-1ubuntu1) ... > Setting up libjansson4:amd64 (2.12-1build1) ... > Setting up ssl-cert (1.0.39) ... > Setting up liblua5.2-0:amd64 (5.2.4-1.1build3) ... > Setting up apache2-data (2.4.41-4ubuntu3.12) ... > Setting up libaprutil1:amd64 (1.6.1-4ubuntu2) ... > Setting up libaprutil1-ldap:amd64 (1.6.1-4ubuntu2) ... > Setting up libaprutil1-dbd-sqlite3:amd64 (1.6.1-4ubuntu2) ... > Setting up apache2-utils (2.4.41-4ubuntu3.12) ... > Setting up apache2-bin (2.4.41-4ubuntu3.12) ... > Setting up apache2 (2.4.41-4ubuntu3.12) ... > **Enabling module mpm\_event.** > **Enabling module authz\_core.** > **Enabling module authz\_host.** > **Enabling module authn\_core.** > **Enabling module auth\_basic.** > **Enabling module access\_compat.** > **Enabling module authn\_file.** > **Enabling module authz\_user.** > **Enabling module alias.** > **Enabling module dir.** > **Enabling module autoindex.** > **Enabling module env.** > **Enabling module mime.** > **Enabling module negotiation.** > **Enabling module setenvif.** > **Enabling module filter.** > **Enabling module deflate.** > **Enabling module status.** > **Enabling module reqtimeout.** > **Enabling conf charset.** > **Enabling conf localized-error-pages.** > **Enabling conf other-vhosts-access-log.** > **Enabling conf security.** > **Enabling conf serve-cgi-bin.** > **Enabling site 000-default.** > Created symlink /etc/systemd/system/multi-user.target.wants/apache2.service → /lib/systemd/system/apache2.service. > Created symlink /etc/systemd/system/multi-user.target.wants/apache-htcacheclean.service → /lib/systemd/system/apache-htcacheclean.service. > Processing triggers for ufw (0.36-6ubuntu1) ... > Processing triggers for systemd (245.4-4ubuntu3.17) ... > Processing triggers for man-db (2.9.1-1) ... > Processing triggers for libc-bin (2.31-0ubuntu9.9) ... ##### **2 與 RedHat / CentOS 系列的小差異** 特別先提醒一下,和 RedHat / CentOS 系列的 apahce 管理不大一樣,在 RedHat / CentOS 平台中要啟用特定的模組,只要安裝好對應的模組套件,再重新啟用 httpd 服務即可,但是在 Ubuntu Server 中,除了要安裝對應的模組套件外,要額外使用 a2emod 指令來指用模組,並重新啟用 apache 服務才可啟用,不然會發生明明就裝了模組但是一定沒有啟用對應功能的情況,這部份後續會再介紹其使用方式。 ##### **3 確認服務啟用狀態** 利用 netstat 指令確認服務是否有啟動(有發現 80 port 運作中,但是 443 預設沒有啟用)。 ```shell $ netstat -tlnp (Not all processes could be identified, non-owned process info will not be shown, you would have to be root to see it all.) Active Internet connections (only servers) Proto Recv-Q Send-Q Local Address Foreign Address State PID/Program name tcp 0 0 127.0.0.53:53 0.0.0.0:* LISTEN - tcp 0 0 0.0.0.0:22 0.0.0.0:* LISTEN - tcp 0 0 127.0.0.1:6010 0.0.0.0:* LISTEN - tcp6 0 0 :::80 :::* LISTEN - tcp6 0 0 :::22 :::* LISTEN - tcp6 0 0 ::1:6010 :::* LISTEN - ``` 利用 systemctl 指令查看一下相關服務的啟用情況。 ```shell $ sudo systemctl status apache2 ● apache2.service - The Apache HTTP Server Loaded: loaded (/lib/systemd/system/apache2.service; enabled; vendor preset: enabled) Active: active (running) since Wed 2022-07-27 09:56:39 CST; 6min ago Docs: https://httpd.apache.org/docs/2.4/ Main PID: 7307 (apache2) Tasks: 55 (limit: 2273) Memory: 5.2M CGroup: /system.slice/apache2.service ├─7307 /usr/sbin/apache2 -k start ├─7308 /usr/sbin/apache2 -k start └─7309 /usr/sbin/apache2 -k start Jul 27 09:56:39 ubuntu-test-server2 systemd[1]: Starting The Apache HTTP Server... Jul 27 09:56:39 ubuntu-test-server2 apachectl[7291]: AH00558: apache2: Could not reliably determine the server's fully qualified domain name, using 127.0.1.1. Set the 'ServerName' directive globally to suppr> Jul 27 09:56:39 ubuntu-test-server2 systemd[1]: Started The Apache HTTP Server. lines 1-15/15 (END) ``` 這個時候連線可以看到以下網頁內容(目前是一般 80 port 的畫面): [](https://docs.ossii.com.tw/uploads/images/gallery/2022-07/image-1658887837048.png) ##### **4 啟用 SSL 模組** 由於 Ubuntu Server 的 apahce 預設沒有啟用 SSL 模組,而現在因為資安要求,都希望網頁能直接啟用 SSL 模組,不然會影響到你的主機排名,或是單位內的資安政策,在 Ubuntu Server 中要啟用 Apache SSL 模組的方式如下: 先啟用 apache ssl 模組,並 restart apache2 服務。 ```shell $ sudo a2enmod ssl Considering dependency setenvif for ssl: Module setenvif already enabled Considering dependency mime for ssl: Module mime already enabled Considering dependency socache_shmcb for ssl: Enabling module socache_shmcb. Enabling module ssl. See /usr/share/doc/apache2/README.Debian.gz on how to configure SSL and create self-signed certificates. To activate the new configuration, you need to run: systemctl restart apache2 $ sudo systemctl restart apache2 ``` 此時一樣用 netstat 指令查一下,會發現有 443 port 已啟用。 ```shell $ netstat -tlnp (Not all processes could be identified, non-owned process info will not be shown, you would have to be root to see it all.) Active Internet connections (only servers) Proto Recv-Q Send-Q Local Address Foreign Address State PID/Program name tcp 0 0 127.0.0.53:53 0.0.0.0:* LISTEN - tcp 0 0 0.0.0.0:22 0.0.0.0:* LISTEN - tcp 0 0 127.0.0.1:6010 0.0.0.0:* LISTEN - tcp6 0 0 :::80 :::* LISTEN - tcp6 0 0 :::22 :::* LISTEN - tcp6 0 0 ::1:6010 :::* LISTEN - tcp6 0 0 :::443 :::* LISTEN - ``` 但是直接連結網頁會失敗。 [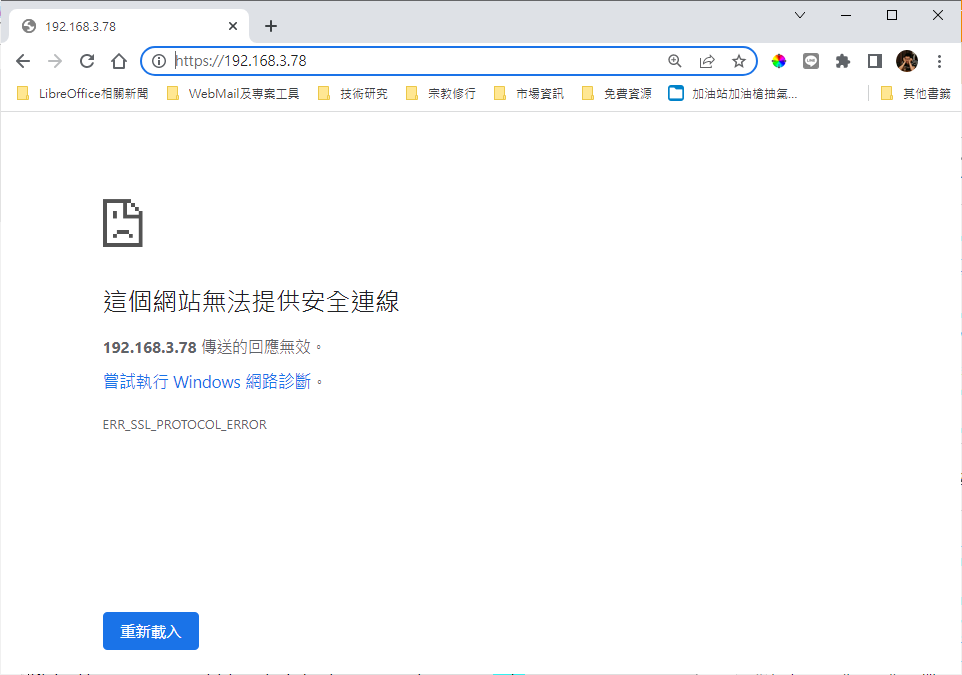](https://docs.ossii.com.tw/uploads/images/gallery/2022-07/image-1658891285288.png) ##### **5 調整 SSL 網站設定檔** 為了要讓預設的 SSL 網站設定生效,請使用以下指令啟用設定。 ```shell $ sudo a2ensite default-ssl.conf Enabling site default-ssl. To activate the new configuration, you need to run: systemctl reload apache2 $ sudo systemctl restart apache2 ``` 再次連線 SSL 的網頁,apache over SSL 的網頁就正常運作了。 [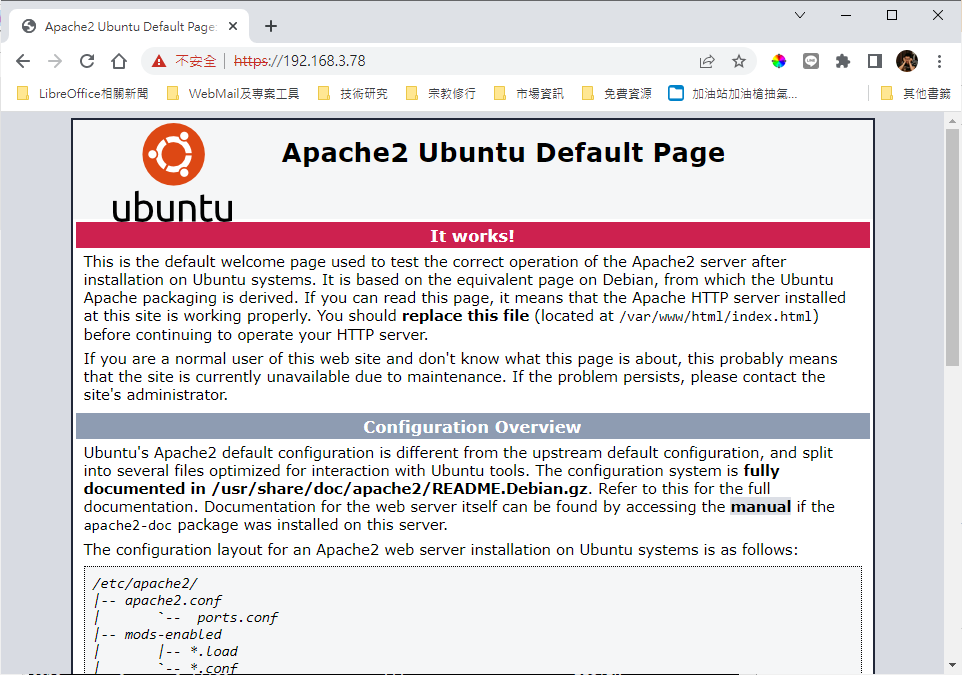](https://docs.ossii.com.tw/uploads/images/gallery/2022-07/image-1658891620357.png) 因為不是合法的 SSL 憑證(預設測試用),所以瀏覽器會出現「不安全」的警示,建議要正式佈署的朋友們要自行申請 SSL 憑證 ~ 例如像是:let's encrypt。 ##### **6 設定檔位置** 在本文中相關的設定檔位置如下: - 一般設定檔 ``` /etc/apache2/apache2.conf ``` - SSL 設定檔 ```shell /etc/apache2/sites-available/default-ssl.conf ``` 這樣子就完第了 apache server 的初步安裝作業了~ # 安裝 PHP 8.1 版 ##### **1 增加新版 PHP 套件庫來源** 要安裝新版的 PHP 8 需要加入 Ondřej Surý (PHP 和 Debian 的首席開發人員,並維護 Ubuntu 和 Debian 套件) PHP PPA 的來源,指令如下: ```shell $ sudo apt install software-properties-common [sudo] password for ossii: ``` 接下來新增 PHP 8 的 PPA 來源,指令如下: ```shell $ sudo add-apt-repository ppa:ondrej/php ``` 中間會出現這行訊息,請按下「Enter」鍵繼續跑 > Press \[ENTER\] to continue or Ctrl-c to cancel adding it. 出現以下訊息就代表匯入完成了: > Hit:1 http://tw.archive.ubuntu.com/ubuntu focal InRelease > Get:2 http://tw.archive.ubuntu.com/ubuntu focal-updates InRelease \[114 kB\] > Get:3 http://tw.archive.ubuntu.com/ubuntu focal-backports InRelease \[108 kB\] > Get:4 http://tw.archive.ubuntu.com/ubuntu focal-security InRelease \[114 kB\] > Get:5 http://tw.archive.ubuntu.com/ubuntu focal-updates/universe amd64 Packages \[924 kB\] > Get:6 http://tw.archive.ubuntu.com/ubuntu focal-updates/universe Translation-en \[208 kB\] > Get:7 http://tw.archive.ubuntu.com/ubuntu focal-updates/universe amd64 c-n-f Metadata \[21.0 kB\] > Get:8 http://tw.archive.ubuntu.com/ubuntu focal-security/universe amd64 Packages \[711 kB\] > Get:9 http://tw.archive.ubuntu.com/ubuntu focal-security/universe Translation-en \[128 kB\] > Get:10 http://tw.archive.ubuntu.com/ubuntu focal-security/universe amd64 c-n-f Metadata \[14.7 kB\] > Get:11 http://ppa.launchpad.net/ondrej/php/ubuntu focal InRelease \[23.9 kB\] > Get:12 http://ppa.launchpad.net/ondrej/php/ubuntu focal/main amd64 Packages \[102 kB\] > Get:13 http://ppa.launchpad.net/ondrej/php/ubuntu focal/main Translation-en \[33.6 kB\] > Fetched 2,503 kB in 4s (637 kB/s) > **Reading package lists... Done** ##### **2 更新 apt 來源** 執行 apt update 指令,也許會有需要更新的套件。 ```shell $ sudo apt update $ sudo apt upgrade -y ``` ##### **3 安裝 PHP 8.1 相關套件** PHP 的套件與模組很多,以下是一般常會用到的套件,安裝指令如下: ```shell $ sudo apt install php8.1 libapache2-mod-php8.1 php8.1-gd php8.1-mysql php8.1-curl php8.1-mbstring php8.1-intl -y $ sudo apt install php8.1-gmp php8.1-bcmath php8.1-imagick php8.1-xml php8.1-zip -y ``` ##### **4 啟用 Apache 的 PHP 模組** 如同前一章所述,Ubuntu 下的 Apache 模組需要先以 a2enmod 的指令啟用,指令如下: ```shell $ sudo a2enmod php8.1 $ sudo systemctl restart apache2 ``` ##### **5 測試 PHP 版本資訊** 啟動完成後,在 /var/www/html/ 的目錄下新增一個名叫 info.php 的檔案,指令和內容如下: ```shell $ sudo vim /var/www/html/info.php ``` 把以下的內容寫入 info.php 中,內容如下: > <?php > > phpinfo(); > > ?> 存檔後離開,接下來請用瀏覽器存取這個 php 檔,位置是 https://yourhostip/info.php,正常會得到以下內容畫面: [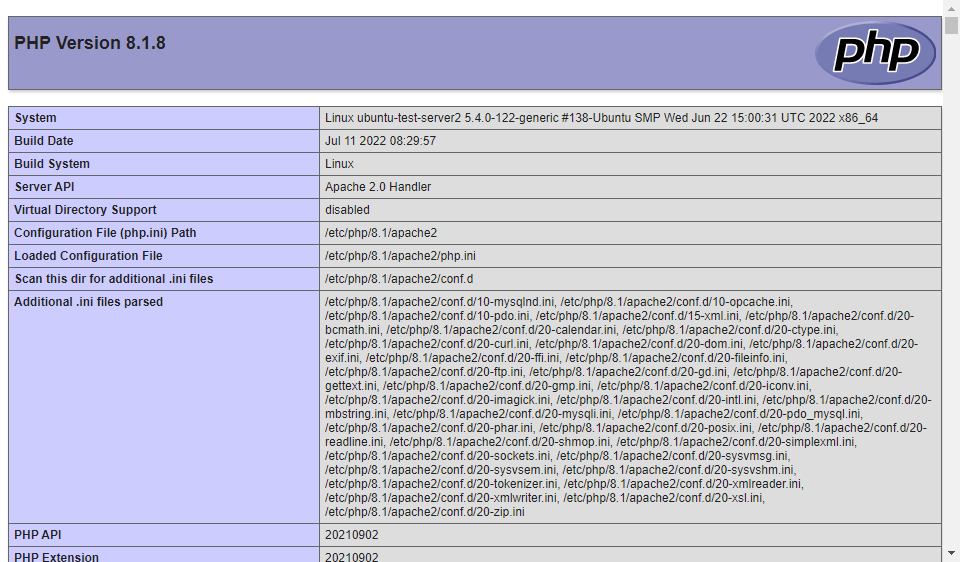](https://docs.ossii.com.tw/uploads/images/gallery/2022-07/image-1658906105129.png) 你可以透過這個頁面瞭解目前 Apache 伺服器上與 PHP 相關的資訊,測試完後,可以把 info.php 這個檔案刪掉,如此就完成 PHP 的安裝作業了。 # 安裝 MariaDB 10.3 版 ##### **1 安裝 MariaDB 10.3 套件** 在 Ubuntu Server 20.04 安裝 MariaDB 10.3 相對簡單,而且 10.3 是比較穩定的版本,故目前仍建議使用預設的版本,安裝指令如下所示,這個版本的 MariaDB 相依了非常多的套件。 ```shell $ sudo apt install mariadb-server -y ``` ##### **2 初始化 MariaDB 資料庫環境** 因為 Ubuntu Server 20.04 預設會啟用服務,所以可以直接初始化 MariaDB 的環境,指令如下: ```shell 先直接切換成 root 身份,使用 sudo 指令會有奇怪的狀況發生 $ sudo su - # mysql_secure_installation ``` 接下來會一直問各種問題,如下所示,詢問目前 root 用戶的密碼,因為一開始沒有設定,請直接按 Enter 鍵繼續。 ```shell NOTE: RUNNING ALL PARTS OF THIS SCRIPT IS RECOMMENDED FOR ALL MariaDB SERVERS IN PRODUCTION USE! PLEASE READ EACH STEP CAREFULLY! In order to log into MariaDB to secure it, we'll need the current password for the root user. If you've just installed MariaDB, and you haven't set the root password yet, the password will be blank, so you should just press enter here. Enter current password for root (enter for none):直接按 Enter 鍵 ``` 要不要設定 root 密碼?按下 Y 並輸入二次密碼。 ``` OK, successfully used password, moving on... Setting the root password ensures that nobody can log into the MariaDB root user without the proper authorisation. Set root password? [Y/n] Y New password: Re-enter new password: Password updated successfully! Reloading privilege tables.. ... Success! ``` 是否要移除 anonymous users 的密碼?按下 Y 繼續。 ```shell By default, a MariaDB installation has an anonymous user, allowing anyone to log into MariaDB without having to have a user account created for them. This is intended only for testing, and to make the installation go a bit smoother. You should remove them before moving into a production environment. Remove anonymous users? [Y/n] Y ... Success! ``` 是否要關閉 root 從遠端登入的權限?按下 Y 繼續。 ```shell Normally, root should only be allowed to connect from 'localhost'. This ensures that someone cannot guess at the root password from the network. Disallow root login remotely? [Y/n] Y ... Success! ``` 是否要移除測試資料庫?按下 Y 繼續。 ```shell By default, MariaDB comes with a database named 'test' that anyone can access. This is also intended only for testing, and should be removed before moving into a production environment. Remove test database and access to it? [Y/n] Y - Dropping test database... ... Success! - Removing privileges on test database... ... Success! ``` 是否要 Reload 權限?按下 Y 繼續。 ```shell Reloading the privilege tables will ensure that all changes made so far will take effect immediately. Reload privilege tables now? [Y/n] Y ... Success! Cleaning up... All done! If you've completed all of the above steps, your MariaDB installation should now be secure. Thanks for using MariaDB! ``` 完成 MariaDB 初始化設定工作,然後執行 exit 指令跳出 root 身份。 ```shell # exit ``` ##### **3 重新啟動 MariaDB 服務** ```shell $ sudo systemctl restart mariadb ``` ##### **4 確認 MariaDB 服務狀態** 利用 netstat 指令確認服務是否有啟動(有發現 3306 port 運作中)。 ```shell $ sudo netstat -tlnp Active Internet connections (only servers) Proto Recv-Q Send-Q Local Address Foreign Address State PID/Program name tcp 0 0 127.0.0.1:3306 0.0.0.0:* LISTEN 22965/mysqld tcp 0 0 127.0.0.53:53 0.0.0.0:* LISTEN 603/systemd-resolve tcp 0 0 0.0.0.0:22 0.0.0.0:* LISTEN 690/sshd: /usr/sbin tcp 0 0 127.0.0.1:6010 0.0.0.0:* LISTEN 22203/sshd: ossii@p tcp6 0 0 :::80 :::* LISTEN 21359/apache2 tcp6 0 0 :::22 :::* LISTEN 690/sshd: /usr/sbin tcp6 0 0 ::1:6010 :::* LISTEN 22203/sshd: ossii@p tcp6 0 0 :::443 :::* LISTEN 21359/apache2 ``` 利用 systemctl 指令查看一下相關服務的啟用情況。 ```shell $ sudo systemctl status mariadb ● mariadb.service - MariaDB 10.3.34 database server Loaded: loaded (/lib/systemd/system/mariadb.service; enabled; vendor preset: enabled) Active: active (running) since Wed 2022-07-27 19:53:43 CST; 41s ago Docs: man:mysqld(8) https://mariadb.com/kb/en/library/systemd/ Process: 24511 ExecStartPre=/usr/bin/install -m 755 -o mysql -g root -d /var/run/mysqld (code=exited, status=0/SUCCESS) Process: 24521 ExecStartPre=/bin/sh -c systemctl unset-environment _WSREP_START_POSITION (code=exited, status=0/SUCCESS) Process: 24528 ExecStartPre=/bin/sh -c [ ! -e /usr/bin/galera_recovery ] && VAR= || VAR=`cd /usr/bin/..; /usr/bin/galera_recovery`; [ $? -eq 0 ] && systemctl set-environment _WSREP_START_POSITION=$VA> Process: 24609 ExecStartPost=/bin/sh -c systemctl unset-environment _WSREP_START_POSITION (code=exited, status=0/SUCCESS) Process: 24611 ExecStartPost=/etc/mysql/debian-start (code=exited, status=0/SUCCESS) Main PID: 24578 (mysqld) Status: "Taking your SQL requests now..." Tasks: 31 (limit: 2273) Memory: 63.6M CGroup: /system.slice/mariadb.service └─24578 /usr/sbin/mysqld Jul 27 19:53:43 ubuntu-test-server2 mysqld[24578]: 2022-07-27 19:53:43 0 [Note] /usr/sbin/mysqld (mysqld 10.3.34-MariaDB-0ubuntu0.20.04.1) starting as process 24578 ... Jul 27 19:53:43 ubuntu-test-server2 systemd[1]: Started MariaDB 10.3.34 database server. Jul 27 19:53:43 ubuntu-test-server2 /etc/mysql/debian-start[24613]: Upgrading MySQL tables if necessary. Jul 27 19:53:43 ubuntu-test-server2 /etc/mysql/debian-start[24616]: Looking for 'mysql' as: /usr/bin/mysql Jul 27 19:53:43 ubuntu-test-server2 /etc/mysql/debian-start[24616]: Looking for 'mysqlcheck' as: /usr/bin/mysqlcheck Jul 27 19:53:43 ubuntu-test-server2 /etc/mysql/debian-start[24616]: This installation of MariaDB is already upgraded to 10.3.34-MariaDB. Jul 27 19:53:43 ubuntu-test-server2 /etc/mysql/debian-start[24616]: There is no need to run mysql_upgrade again for 10.3.34-MariaDB. Jul 27 19:53:43 ubuntu-test-server2 /etc/mysql/debian-start[24616]: You can use --force if you still want to run mysql_upgrade Jul 27 19:53:43 ubuntu-test-server2 /etc/mysql/debian-start[24625]: Checking for insecure root accounts. Jul 27 19:53:43 ubuntu-test-server2 /etc/mysql/debian-start[24629]: Triggering myisam-recover for all MyISAM tables and aria-recover for all Aria tables ``` 如此就完成 MariaDB 的安裝工作了。 # 安裝 phpMyAdmin ##### **1 透過 apt 安裝 phpMyAdmin** Ubuntu Server 20.04 預設使用 phpMyAdmin 的版為 4.9.5,apt 安裝指令如下: ```shell $ sudo apt install phpmyadmin php-mbstring php-zip php-gd php-json php-curl -y ``` ##### **2 開始設定 phpMyAdmin** 第一次安裝時,會跳出以下的畫面,詢問是配合哪一個 Web 服務,預設為 apache2,請將滑鼠光標切換到 OK 並按下 Enter 鍵繼續。 [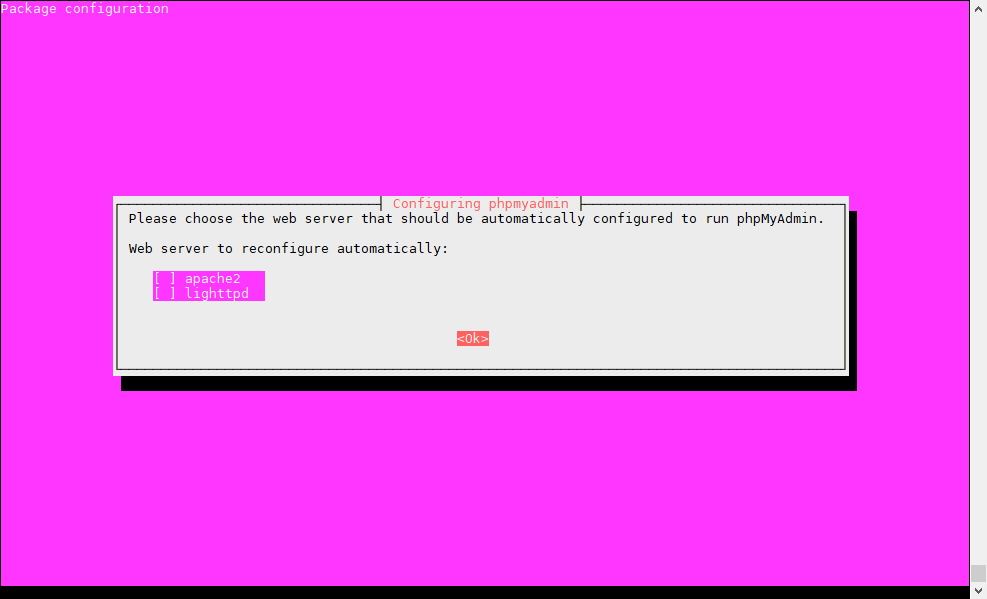](https://docs.ossii.com.tw/uploads/images/gallery/2022-07/image-1658926867149.png) 接下來的畫面請選擇 Yes 並按 Enter 以安裝和設定資料庫。 [](https://docs.ossii.com.tw/uploads/images/gallery/2022-07/image-1658927031875.png) 接下來的畫面,MySQL application password 僅會在 phpMyAdmin 內部用於與資料庫(本例為 MariaDB )溝通時使用。可以將此留空,系統會自動生成密碼。只需按 ENTER 繼續。 [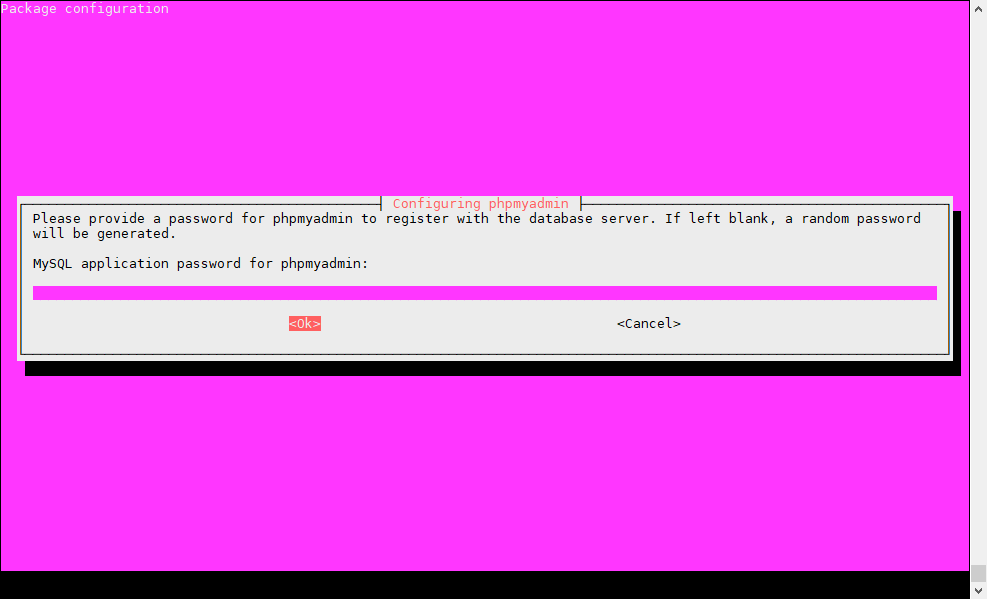](https://docs.ossii.com.tw/uploads/images/gallery/2022-07/image-1658927176790.png) **為了更安全的使用 phpmyadmin,建議在 apache2 的設定檔中,加入以下內容,指令如下:** ```shell $ sudo vim /etc/apache2/conf-available/phpmyadmin.conf ``` 加入以下內容: > \# Apache configuration for phpMyAdmin > Alias /phpMyAdmin /usr/share/phpmyadmin/ > Alias /phpmyadmin /usr/share/phpmyadmin/ > > <Directory /usr/share/phpmyadmin/> > AddDefaultCharset UTF-8 > > <IfModule mod\_authz\_core.c> > # Apache 2.4 > Require all granted > </IfModule> > > </Directory> 存檔之後,執行以下指令啟用 php mbstring 模組及 phpmyadmin 的設定檔,並重新啟動 apahce2。 ```shell $ sudo a2enconf phpmyadmin $ sudo phpenmod mbstring $ sudo systemctl restart apache2 ``` 在網址後面打 /phpmyadmin 或是 /phpMyAdmin 即可登入使用,最後即完成初步的安裝設定工作。 ##### **3 建立 MySQL 使用者** 因為要透過 phpMyAdmin 來管理 MariaDB,在 Ubuntu Server 20.04 的環境中預設無法以 root 身份登入你的 MariaDB 伺服器,所以透過建立一個 MariaDB 使用者,即可透過 phpMyAdmin 來管理資料庫,指令如下: 先以指令,以 root 身份在本機登入 MariaDB: ```shell $ sudo mysql -u root -p ``` 輸入 root 密碼,登入後執行以下的幾個指令新增 MariaDB 用戶帳號。 ```shell Welcome to the MariaDB monitor. Commands end with ; or \g. Your MariaDB connection id is 58 Server version: 10.3.34-MariaDB-0ubuntu0.20.04.1 Ubuntu 20.04 Copyright (c) 2000, 2018, Oracle, MariaDB Corporation Ab and others. Type 'help;' or '\h' for help. Type '\c' to clear the current input statement. MariaDB [(none)]> GRANT ALL PRIVILEGES ON *.* TO '用戶帳號(例:administrator)'@'localhost' IDENTIFIED BY '你預期要設定的密碼'; Query OK, 0 rows affected (0.001 sec) MariaDB [(none)]> exit Bye ``` 跳出後即完成新增帳號的工作。 ##### **4 登入 phpMyAdmin Web 界面** 登入的位置為:http://yourip/phpmyadmin,畫面如下: [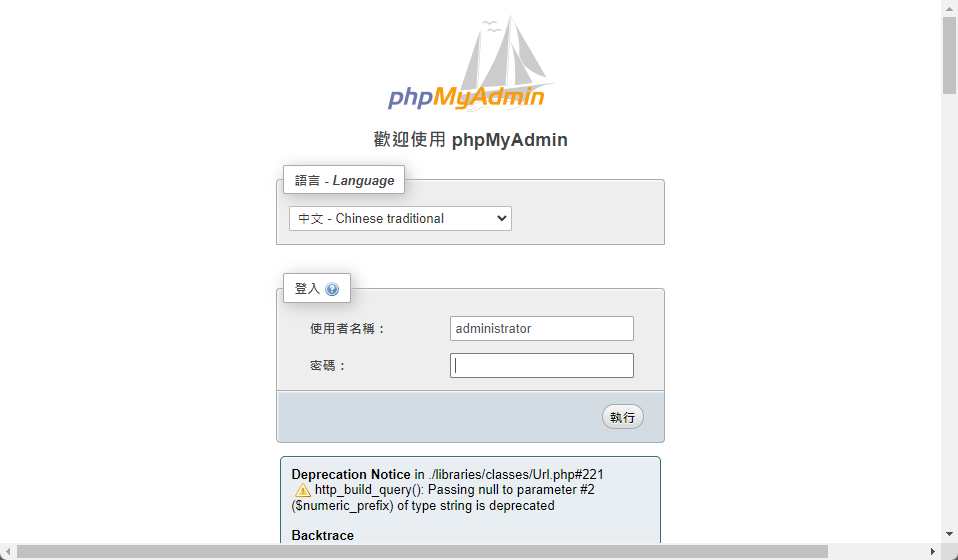](https://docs.ossii.com.tw/uploads/images/gallery/2022-07/image-1659065324560.png) 不過因為我們搭配的是 PHP 8.1,應該要使用 phpMyAdmin 5.1 以上的版本(現為 4.9.5),不過應該還是可以使用,可以暫時忽略 Notice 的訊息,如果覺得不安心,可以將 PHP 的版本降為 7.4 即可,登入的畫面如下。 [](https://docs.ossii.com.tw/uploads/images/gallery/2022-07/image-1659065504134.png) 如此就完成 phpMyAdmin 的佈署了。 ##### **5 建議設定** 因為 phpMyAdmin 管理工具不需要開放給一般人去使用,所以建議只需開放給特定 IP 來源編輯即可,利用修改 apache 的設定檔即可達到此目的,說明如下: ```shell $ sudo vim /etc/apache2/conf-available/phpmyadmin.conf ``` 修改裡面這行,把要開放的網路 IP 或是網路段寫進來即可(原來是:Require all granted)。 > <IfModule mod\_authz\_core.c> > # Apache 2.4 > **Require ip 10.0.0.5 192.168.0.0/24** > </IfModule> 存檔後重新啟動 apache 伺服器。 ```shell $ sudo systemctl restart apache2 ``` 若是從非允許的 IP 位置連入,就會看到以下的畫面。 [](https://docs.ossii.com.tw/uploads/images/gallery/2022-06/image-1654055190246.png)