# 安裝 Apache 伺服器
##### **1 安裝相關套件**
安裝指令如下所示:
```shell
$ sudo apt -y install apache2 apache2-utils
[sudo] password for ossii:
```
接下來會出現一大堆訊息,包含安裝及啟用各式預設的模組功能,如下所示:
> Reading package lists... Done
> Building dependency tree
> Reading state information... Done
> The following package was automatically installed and is no longer required:
> libfwupdplugin1
> Use 'sudo apt autoremove' to remove it.
> **The following additional packages will be installed:**
> **apache2-bin apache2-data libapr1 libaprutil1 libaprutil1-dbd-sqlite3 libaprutil1-ldap libjansson4 liblua5.2-0 ssl-cert**
> **Suggested packages:**
> **apache2-doc apache2-suexec-pristine | apache2-suexec-custom www-browser openssl-blacklist**
> **The following NEW packages will be installed:**
> **apache2 apache2-bin apache2-data apache2-utils libapr1 libaprutil1 libaprutil1-dbd-sqlite3 libaprutil1-ldap libjansson4 liblua5.2-0 ssl-cert**
> 0 upgraded, 11 newly installed, 0 to remove and 0 not upgraded.
> Need to get 1,867 kB of archives.
> After this operation, 8,095 kB of additional disk space will be used.
> Get:1 http://tw.archive.ubuntu.com/ubuntu focal/main amd64 libapr1 amd64 1.6.5-1ubuntu1 \[91.4 kB\]
> Get:2 http://tw.archive.ubuntu.com/ubuntu focal/main amd64 libaprutil1 amd64 1.6.1-4ubuntu2 \[84.7 kB\]
> Get:3 http://tw.archive.ubuntu.com/ubuntu focal/main amd64 libaprutil1-dbd-sqlite3 amd64 1.6.1-4ubuntu2 \[10.5 kB\]
> Get:4 http://tw.archive.ubuntu.com/ubuntu focal/main amd64 libaprutil1-ldap amd64 1.6.1-4ubuntu2 \[8,736 B\]
> Get:5 http://tw.archive.ubuntu.com/ubuntu focal/main amd64 libjansson4 amd64 2.12-1build1 \[28.9 kB\]
> Get:6 http://tw.archive.ubuntu.com/ubuntu focal/main amd64 liblua5.2-0 amd64 5.2.4-1.1build3 \[106 kB\]
> Get:7 http://tw.archive.ubuntu.com/ubuntu focal-updates/main amd64 apache2-bin amd64 2.4.41-4ubuntu3.12 \[1,181 kB\]
> Get:8 http://tw.archive.ubuntu.com/ubuntu focal-updates/main amd64 apache2-data all 2.4.41-4ubuntu3.12 \[159 kB\]
> Get:9 http://tw.archive.ubuntu.com/ubuntu focal-updates/main amd64 apache2-utils amd64 2.4.41-4ubuntu3.12 \[84.5 kB\]
> Get:10 http://tw.archive.ubuntu.com/ubuntu focal-updates/main amd64 apache2 amd64 2.4.41-4ubuntu3.12 \[95.6 kB\]
> Get:11 http://tw.archive.ubuntu.com/ubuntu focal/main amd64 ssl-cert all 1.0.39 \[17.0 kB\]
> Fetched 1,867 kB in 0s (9,618 kB/s)
> Preconfiguring packages ...
> Selecting previously unselected package libapr1:amd64.
> (Reading database ... 74596 files and directories currently installed.)
> Preparing to unpack .../00-libapr1\_1.6.5-1ubuntu1\_amd64.deb ...
> Unpacking libapr1:amd64 (1.6.5-1ubuntu1) ...
> Selecting previously unselected package libaprutil1:amd64.
> Preparing to unpack .../01-libaprutil1\_1.6.1-4ubuntu2\_amd64.deb ...
> Unpacking libaprutil1:amd64 (1.6.1-4ubuntu2) ...
> Selecting previously unselected package libaprutil1-dbd-sqlite3:amd64.
> Preparing to unpack .../02-libaprutil1-dbd-sqlite3\_1.6.1-4ubuntu2\_amd64.deb ...
> Unpacking libaprutil1-dbd-sqlite3:amd64 (1.6.1-4ubuntu2) ...
> Selecting previously unselected package libaprutil1-ldap:amd64.
> Preparing to unpack .../03-libaprutil1-ldap\_1.6.1-4ubuntu2\_amd64.deb ...
> Unpacking libaprutil1-ldap:amd64 (1.6.1-4ubuntu2) ...
> Selecting previously unselected package libjansson4:amd64.
> Preparing to unpack .../04-libjansson4\_2.12-1build1\_amd64.deb ...
> Unpacking libjansson4:amd64 (2.12-1build1) ...
> Selecting previously unselected package liblua5.2-0:amd64.
> Preparing to unpack .../05-liblua5.2-0\_5.2.4-1.1build3\_amd64.deb ...
> Unpacking liblua5.2-0:amd64 (5.2.4-1.1build3) ...
> Selecting previously unselected package apache2-bin.
> Preparing to unpack .../06-apache2-bin\_2.4.41-4ubuntu3.12\_amd64.deb ...
> Unpacking apache2-bin (2.4.41-4ubuntu3.12) ...
> Selecting previously unselected package apache2-data.
> Preparing to unpack .../07-apache2-data\_2.4.41-4ubuntu3.12\_all.deb ...
> Unpacking apache2-data (2.4.41-4ubuntu3.12) ...
> Selecting previously unselected package apache2-utils.
> Preparing to unpack .../08-apache2-utils\_2.4.41-4ubuntu3.12\_amd64.deb ...
> Unpacking apache2-utils (2.4.41-4ubuntu3.12) ...
> Selecting previously unselected package apache2.
> Preparing to unpack .../09-apache2\_2.4.41-4ubuntu3.12\_amd64.deb ...
> Unpacking apache2 (2.4.41-4ubuntu3.12) ...
> Selecting previously unselected package ssl-cert.
> Preparing to unpack .../10-ssl-cert\_1.0.39\_all.deb ...
> Unpacking ssl-cert (1.0.39) ...
> Setting up libapr1:amd64 (1.6.5-1ubuntu1) ...
> Setting up libjansson4:amd64 (2.12-1build1) ...
> Setting up ssl-cert (1.0.39) ...
> Setting up liblua5.2-0:amd64 (5.2.4-1.1build3) ...
> Setting up apache2-data (2.4.41-4ubuntu3.12) ...
> Setting up libaprutil1:amd64 (1.6.1-4ubuntu2) ...
> Setting up libaprutil1-ldap:amd64 (1.6.1-4ubuntu2) ...
> Setting up libaprutil1-dbd-sqlite3:amd64 (1.6.1-4ubuntu2) ...
> Setting up apache2-utils (2.4.41-4ubuntu3.12) ...
> Setting up apache2-bin (2.4.41-4ubuntu3.12) ...
> Setting up apache2 (2.4.41-4ubuntu3.12) ...
> **Enabling module mpm\_event.**
> **Enabling module authz\_core.**
> **Enabling module authz\_host.**
> **Enabling module authn\_core.**
> **Enabling module auth\_basic.**
> **Enabling module access\_compat.**
> **Enabling module authn\_file.**
> **Enabling module authz\_user.**
> **Enabling module alias.**
> **Enabling module dir.**
> **Enabling module autoindex.**
> **Enabling module env.**
> **Enabling module mime.**
> **Enabling module negotiation.**
> **Enabling module setenvif.**
> **Enabling module filter.**
> **Enabling module deflate.**
> **Enabling module status.**
> **Enabling module reqtimeout.**
> **Enabling conf charset.**
> **Enabling conf localized-error-pages.**
> **Enabling conf other-vhosts-access-log.**
> **Enabling conf security.**
> **Enabling conf serve-cgi-bin.**
> **Enabling site 000-default.**
> Created symlink /etc/systemd/system/multi-user.target.wants/apache2.service → /lib/systemd/system/apache2.service.
> Created symlink /etc/systemd/system/multi-user.target.wants/apache-htcacheclean.service → /lib/systemd/system/apache-htcacheclean.service.
> Processing triggers for ufw (0.36-6ubuntu1) ...
> Processing triggers for systemd (245.4-4ubuntu3.17) ...
> Processing triggers for man-db (2.9.1-1) ...
> Processing triggers for libc-bin (2.31-0ubuntu9.9) ...
##### **2 與 RedHat / CentOS 系列的小差異**
特別先提醒一下,和 RedHat / CentOS 系列的 apahce 管理不大一樣,在 RedHat / CentOS 平台中要啟用特定的模組,只要安裝好對應的模組套件,再重新啟用 httpd 服務即可,但是在 Ubuntu Server 中,除了要安裝對應的模組套件外,要額外使用 a2emod 指令來指用模組,並重新啟用 apache 服務才可啟用,不然會發生明明就裝了模組但是一定沒有啟用對應功能的情況,這部份後續會再介紹其使用方式。
##### **3 確認服務啟用狀態**
利用 netstat 指令確認服務是否有啟動(有發現 80 port 運作中,但是 443 預設沒有啟用)。
```shell
$ netstat -tlnp
(Not all processes could be identified, non-owned process info
will not be shown, you would have to be root to see it all.)
Active Internet connections (only servers)
Proto Recv-Q Send-Q Local Address Foreign Address State PID/Program name
tcp 0 0 127.0.0.53:53 0.0.0.0:* LISTEN -
tcp 0 0 0.0.0.0:22 0.0.0.0:* LISTEN -
tcp 0 0 127.0.0.1:6010 0.0.0.0:* LISTEN -
tcp6 0 0 :::80 :::* LISTEN -
tcp6 0 0 :::22 :::* LISTEN -
tcp6 0 0 ::1:6010 :::* LISTEN -
```
利用 systemctl 指令查看一下相關服務的啟用情況。
```shell
$ sudo systemctl status apache2
● apache2.service - The Apache HTTP Server
Loaded: loaded (/lib/systemd/system/apache2.service; enabled; vendor preset: enabled)
Active: active (running) since Wed 2022-07-27 09:56:39 CST; 6min ago
Docs: https://httpd.apache.org/docs/2.4/
Main PID: 7307 (apache2)
Tasks: 55 (limit: 2273)
Memory: 5.2M
CGroup: /system.slice/apache2.service
├─7307 /usr/sbin/apache2 -k start
├─7308 /usr/sbin/apache2 -k start
└─7309 /usr/sbin/apache2 -k start
Jul 27 09:56:39 ubuntu-test-server2 systemd[1]: Starting The Apache HTTP Server...
Jul 27 09:56:39 ubuntu-test-server2 apachectl[7291]: AH00558: apache2: Could not reliably determine the server's fully qualified domain name, using 127.0.1.1. Set the 'ServerName' directive globally to suppr>
Jul 27 09:56:39 ubuntu-test-server2 systemd[1]: Started The Apache HTTP Server.
lines 1-15/15 (END)
```
這個時候連線可以看到以下網頁內容(目前是一般 80 port 的畫面):
[](https://docs.ossii.com.tw/uploads/images/gallery/2022-07/image-1658887837048.png)
##### **4 啟用 SSL 模組**
由於 Ubuntu Server 的 apahce 預設沒有啟用 SSL 模組,而現在因為資安要求,都希望網頁能直接啟用 SSL 模組,不然會影響到你的主機排名,或是單位內的資安政策,在 Ubuntu Server 中要啟用 Apache SSL 模組的方式如下:
先啟用 apache ssl 模組,並 restart apache2 服務。
```shell
$ sudo a2enmod ssl
Considering dependency setenvif for ssl:
Module setenvif already enabled
Considering dependency mime for ssl:
Module mime already enabled
Considering dependency socache_shmcb for ssl:
Enabling module socache_shmcb.
Enabling module ssl.
See /usr/share/doc/apache2/README.Debian.gz on how to configure SSL and create self-signed certificates.
To activate the new configuration, you need to run:
systemctl restart apache2
$ sudo systemctl restart apache2
```
此時一樣用 netstat 指令查一下,會發現有 443 port 已啟用。
```shell
$ netstat -tlnp
(Not all processes could be identified, non-owned process info
will not be shown, you would have to be root to see it all.)
Active Internet connections (only servers)
Proto Recv-Q Send-Q Local Address Foreign Address State PID/Program name
tcp 0 0 127.0.0.53:53 0.0.0.0:* LISTEN -
tcp 0 0 0.0.0.0:22 0.0.0.0:* LISTEN -
tcp 0 0 127.0.0.1:6010 0.0.0.0:* LISTEN -
tcp6 0 0 :::80 :::* LISTEN -
tcp6 0 0 :::22 :::* LISTEN -
tcp6 0 0 ::1:6010 :::* LISTEN -
tcp6 0 0 :::443 :::* LISTEN -
```
但是直接連結網頁會失敗。
[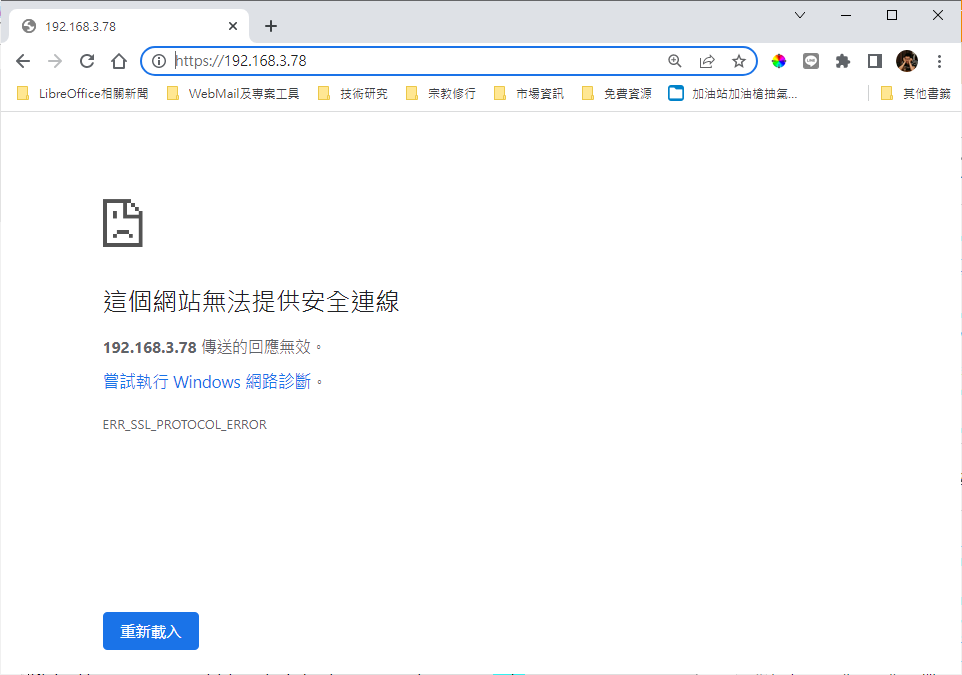](https://docs.ossii.com.tw/uploads/images/gallery/2022-07/image-1658891285288.png)
##### **5 調整 SSL 網站設定檔**
為了要讓預設的 SSL 網站設定生效,請使用以下指令啟用設定。
```shell
$ sudo a2ensite default-ssl.conf
Enabling site default-ssl.
To activate the new configuration, you need to run:
systemctl reload apache2
$ sudo systemctl restart apache2
```
再次連線 SSL 的網頁,apache over SSL 的網頁就正常運作了。
[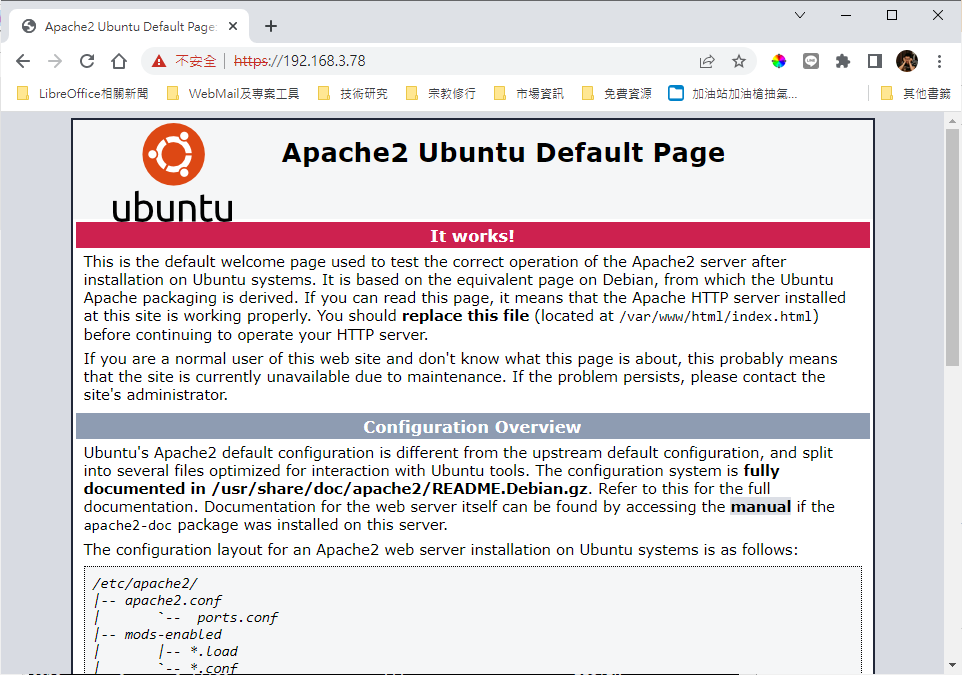](https://docs.ossii.com.tw/uploads/images/gallery/2022-07/image-1658891620357.png)
因為不是合法的 SSL 憑證(預設測試用),所以瀏覽器會出現「不安全」的警示,建議要正式佈署的朋友們要自行申請 SSL 憑證 ~ 例如像是:let's encrypt。
##### **6 設定檔位置**
在本文中相關的設定檔位置如下:
- 一般設定檔
```
/etc/apache2/apache2.conf
```
- SSL 設定檔
```shell
/etc/apache2/sites-available/default-ssl.conf
```
這樣子就完第了 apache server 的初步安裝作業了~